The easiest way to connect Claude or ChatGPT to WordPress just got easier
Connecting Claude or ChatGPT to a WordPress site with WPVibe takes about two minutes: install the plugin, add WPVibe to your AI, approve once in WordPress. That is the whole pitch, and most of the time it holds. When it does not, the cause is almost never the AI. A security plugin turned off Application Passwords. A staging password sits in front of the REST API. The host strips the Authorization header. A firewall challenges anything that is not a browser. Your AI says “authentication failed,” the site works fine in your browser, and the real answer is a support ticket away.
I have read a lot of those tickets. Today’s update makes the easy path easier and the hard path short. The WPVibe page in wp-admin walks you through the connection in four steps, checks your site before you open your AI, and when something is in the way it says what, in plain language, and hands you the fix.
Four steps, and the page keeps score
The setup page is four steps that turn green on their own as you go.
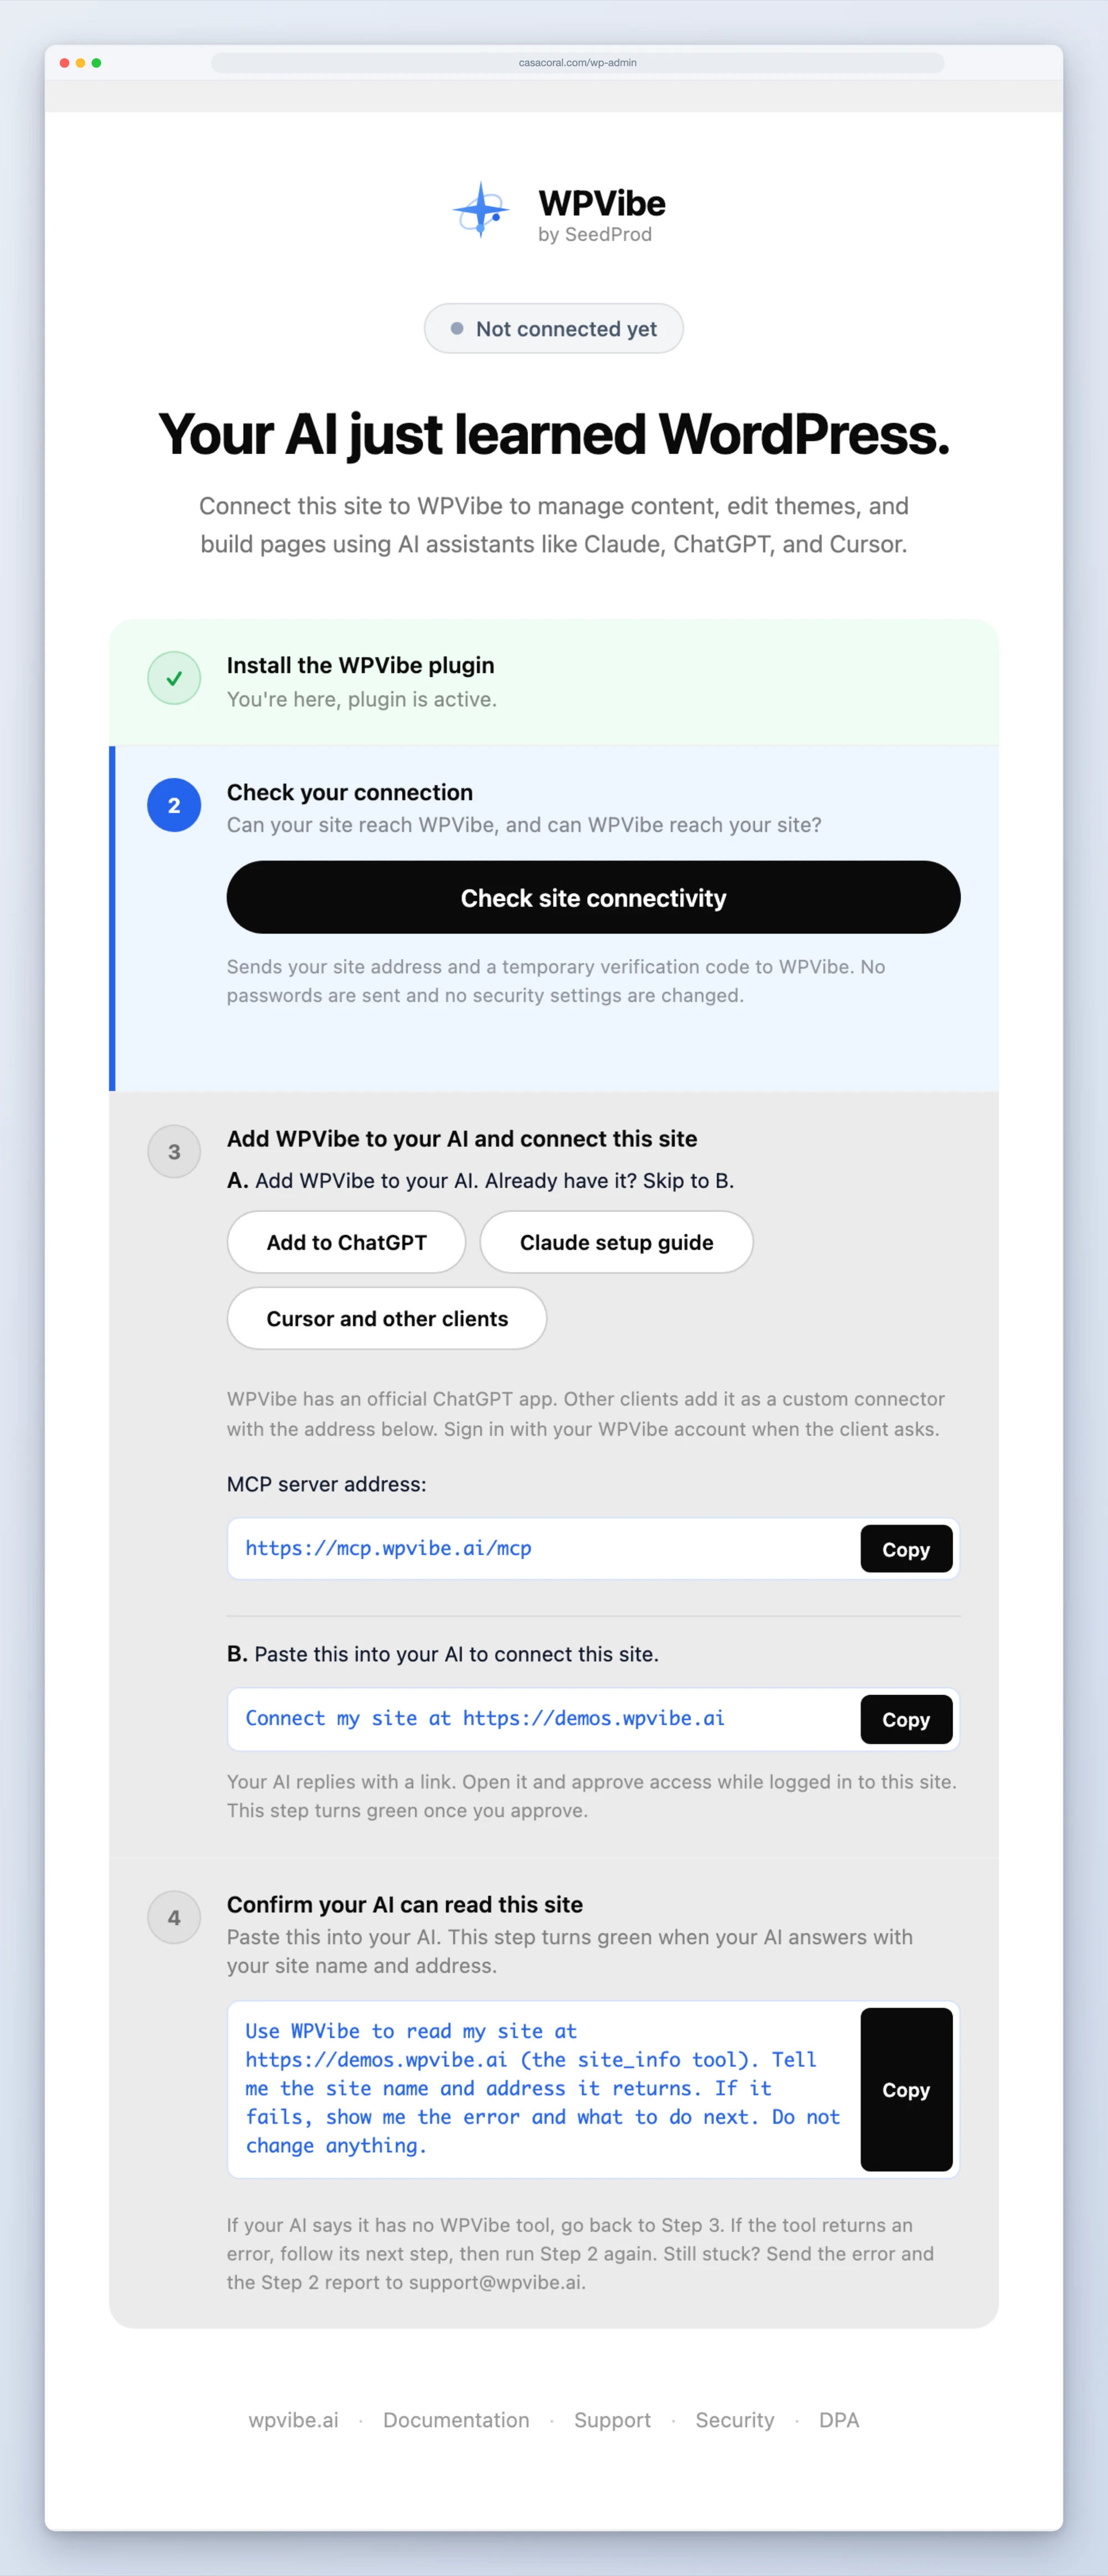
Step 1 is installing the plugin, which you have done if you can see the page. Step 2 is one button: the plugin tests the site from the inside and asks WPVibe to reach it from the outside. Step 3 adds WPVibe to your AI (buttons for the official ChatGPT app, the Claude setup guide, and other clients) and connects the site with one short prompt: “Connect my site at yoursite.com.” You approve in WordPress and the step turns green. Step 4 is one more prompt, and when your AI answers with your site’s name, the step turns green with a signed confirmation that names the client that made the read.
Nothing on this page goes green on a guess. Step 3 is confirmed by WordPress accepting the password WPVibe uses. Step 4 is confirmed by a signed receipt from a real read your AI made through WPVibe. After you copy a prompt, the page watches for both, so there is no refreshing and wondering.
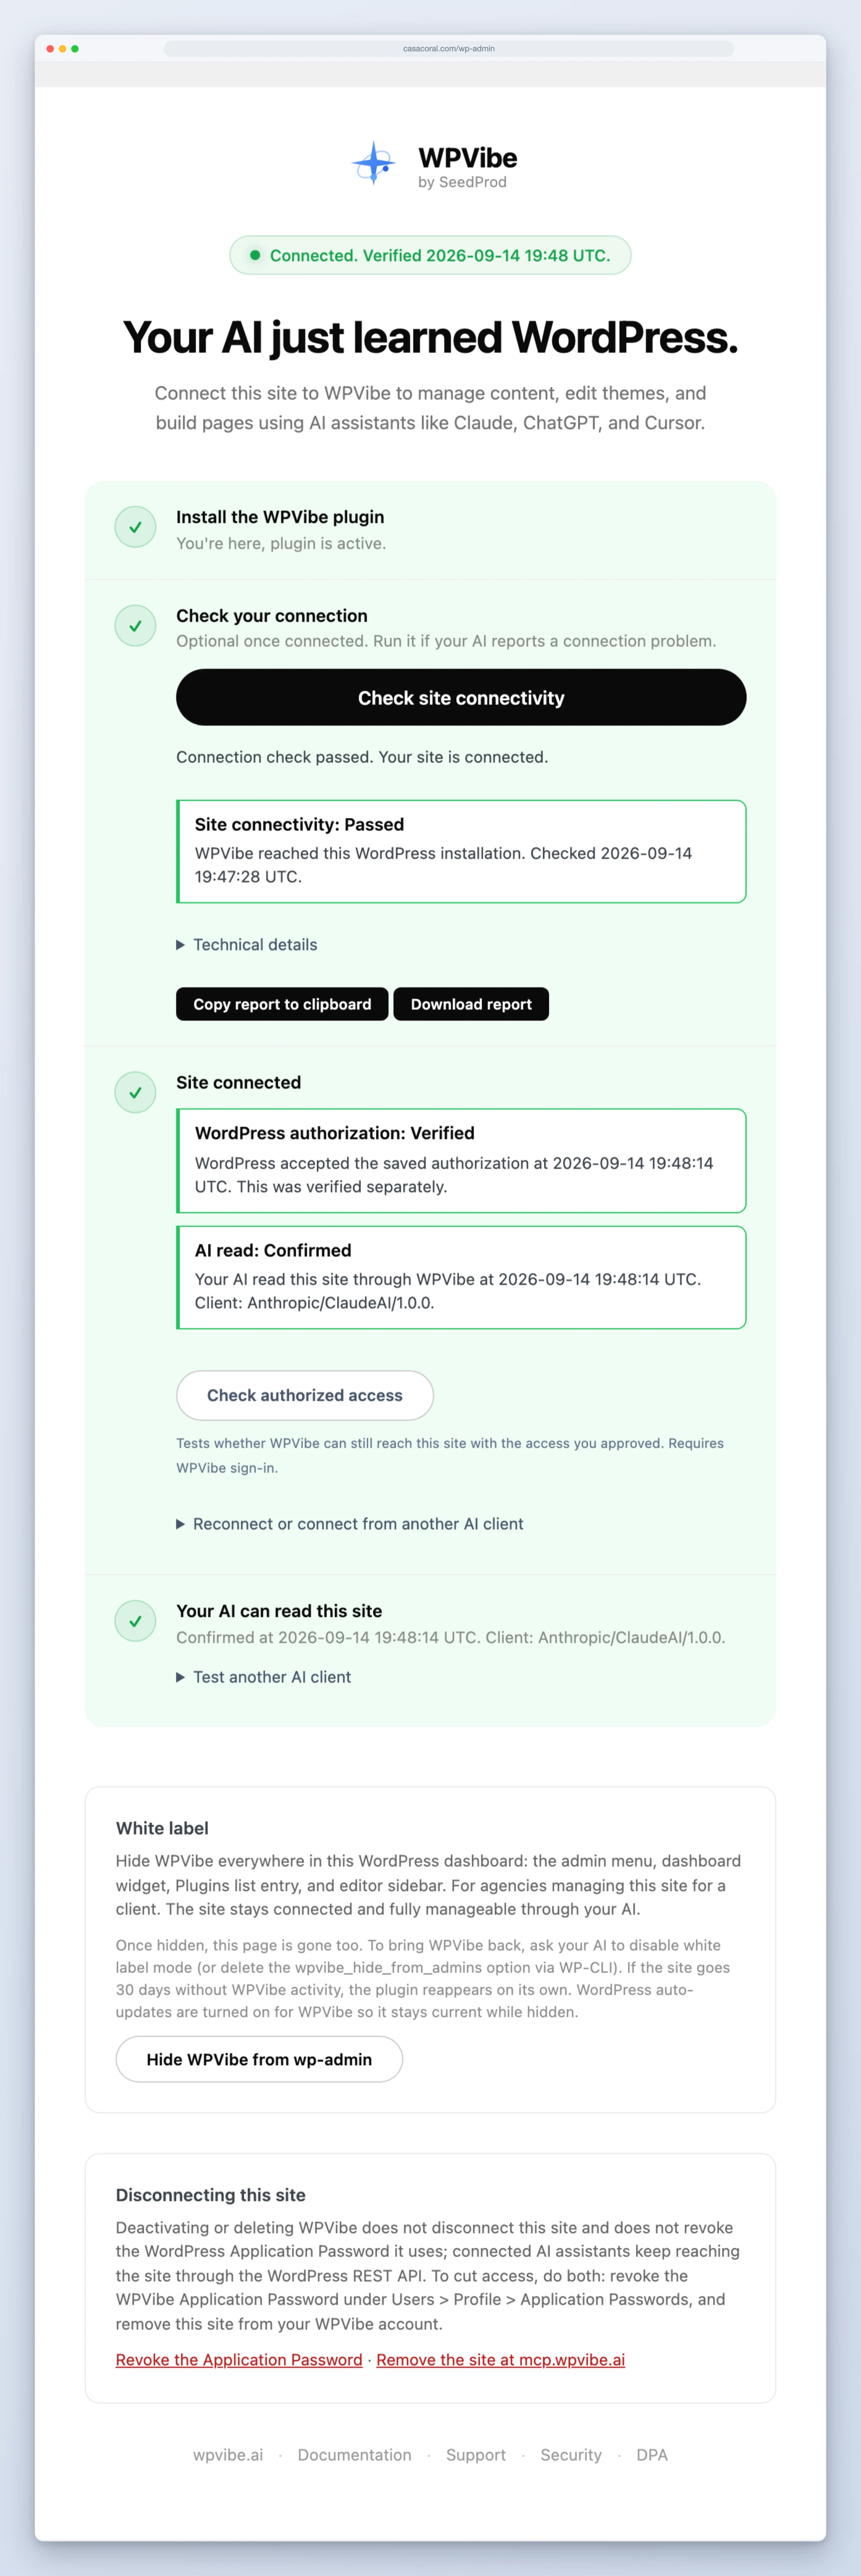
If you had WPVibe connected before this update, nothing changes for you. Update the plugin, open the page if you are curious, and it reads as connected from your recent activity with nothing to do. Your connection is not touched.
Check your connection before your AI has to
Step 2 is where most of those tickets came from, and it now runs from inside the site, so it can see what a remote check cannot. It knows when a security plugin has turned off Application Passwords, and it names the plugin and the setting. It spots a staging password gate or HTTP Basic Auth in front of the REST API. It names a plugin that disables the REST API for logged-out requests. It notices when a maintenance or coming-soon page is answering the API instead of WordPress. It detects a host that strips the Authorization header before it reaches WordPress, and since WPVibe sends a fallback header, it tells you the connection will still work. It also catches a local or private site address that the cloud will never reach.
Then WPVibe reaches back from the outside and reports on the network path, firewalls included.
When something fails you get one card, first, with the cause and the fix. Everything else goes under Technical details for your host, or for us.
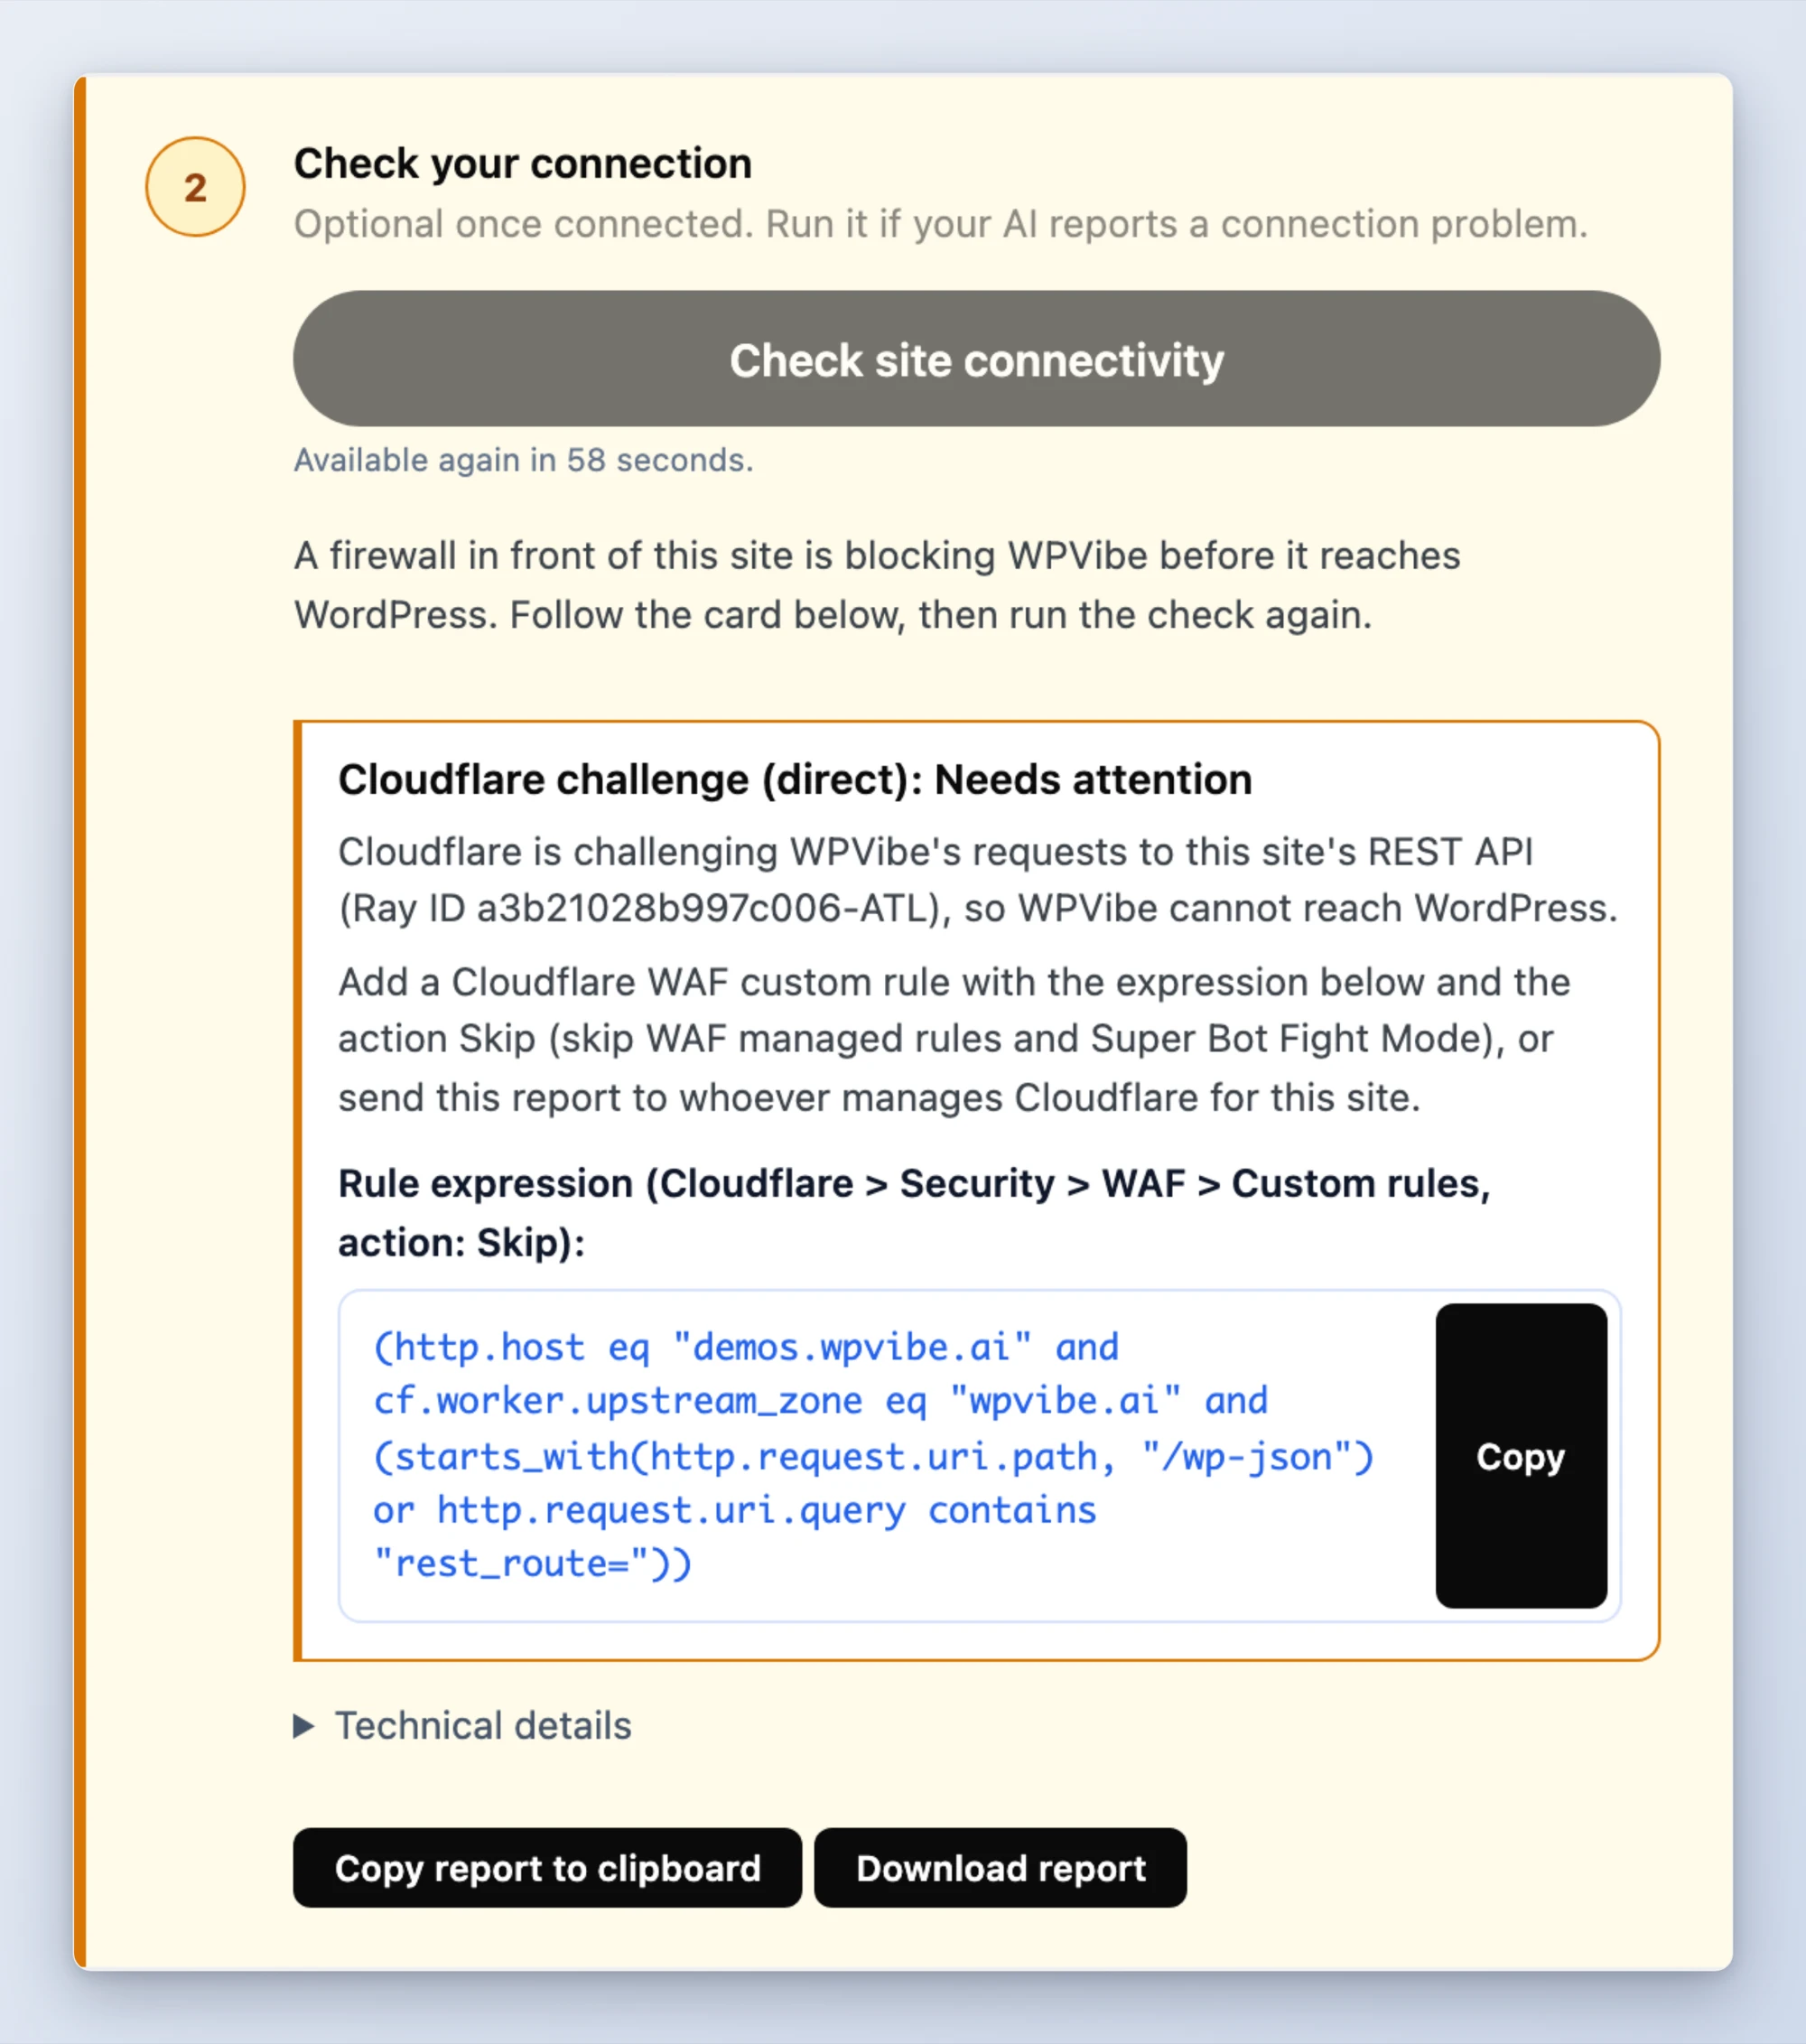
For a Cloudflare challenge the card carries the Ray ID and the exact WAF rule to add, scoped to WPVibe’s requests on your REST path and nothing else. Copy it, paste it into Security > WAF > Custom rules as a Skip rule, and you are done. If your host manages Cloudflare for you, the report says so and you send it to them.
One click when a security plugin turns off Application Passwords
The single most common blocker is a security plugin’s “disable application passwords” setting. Turning it off for the whole site is not what most people want, and I do not blame them.
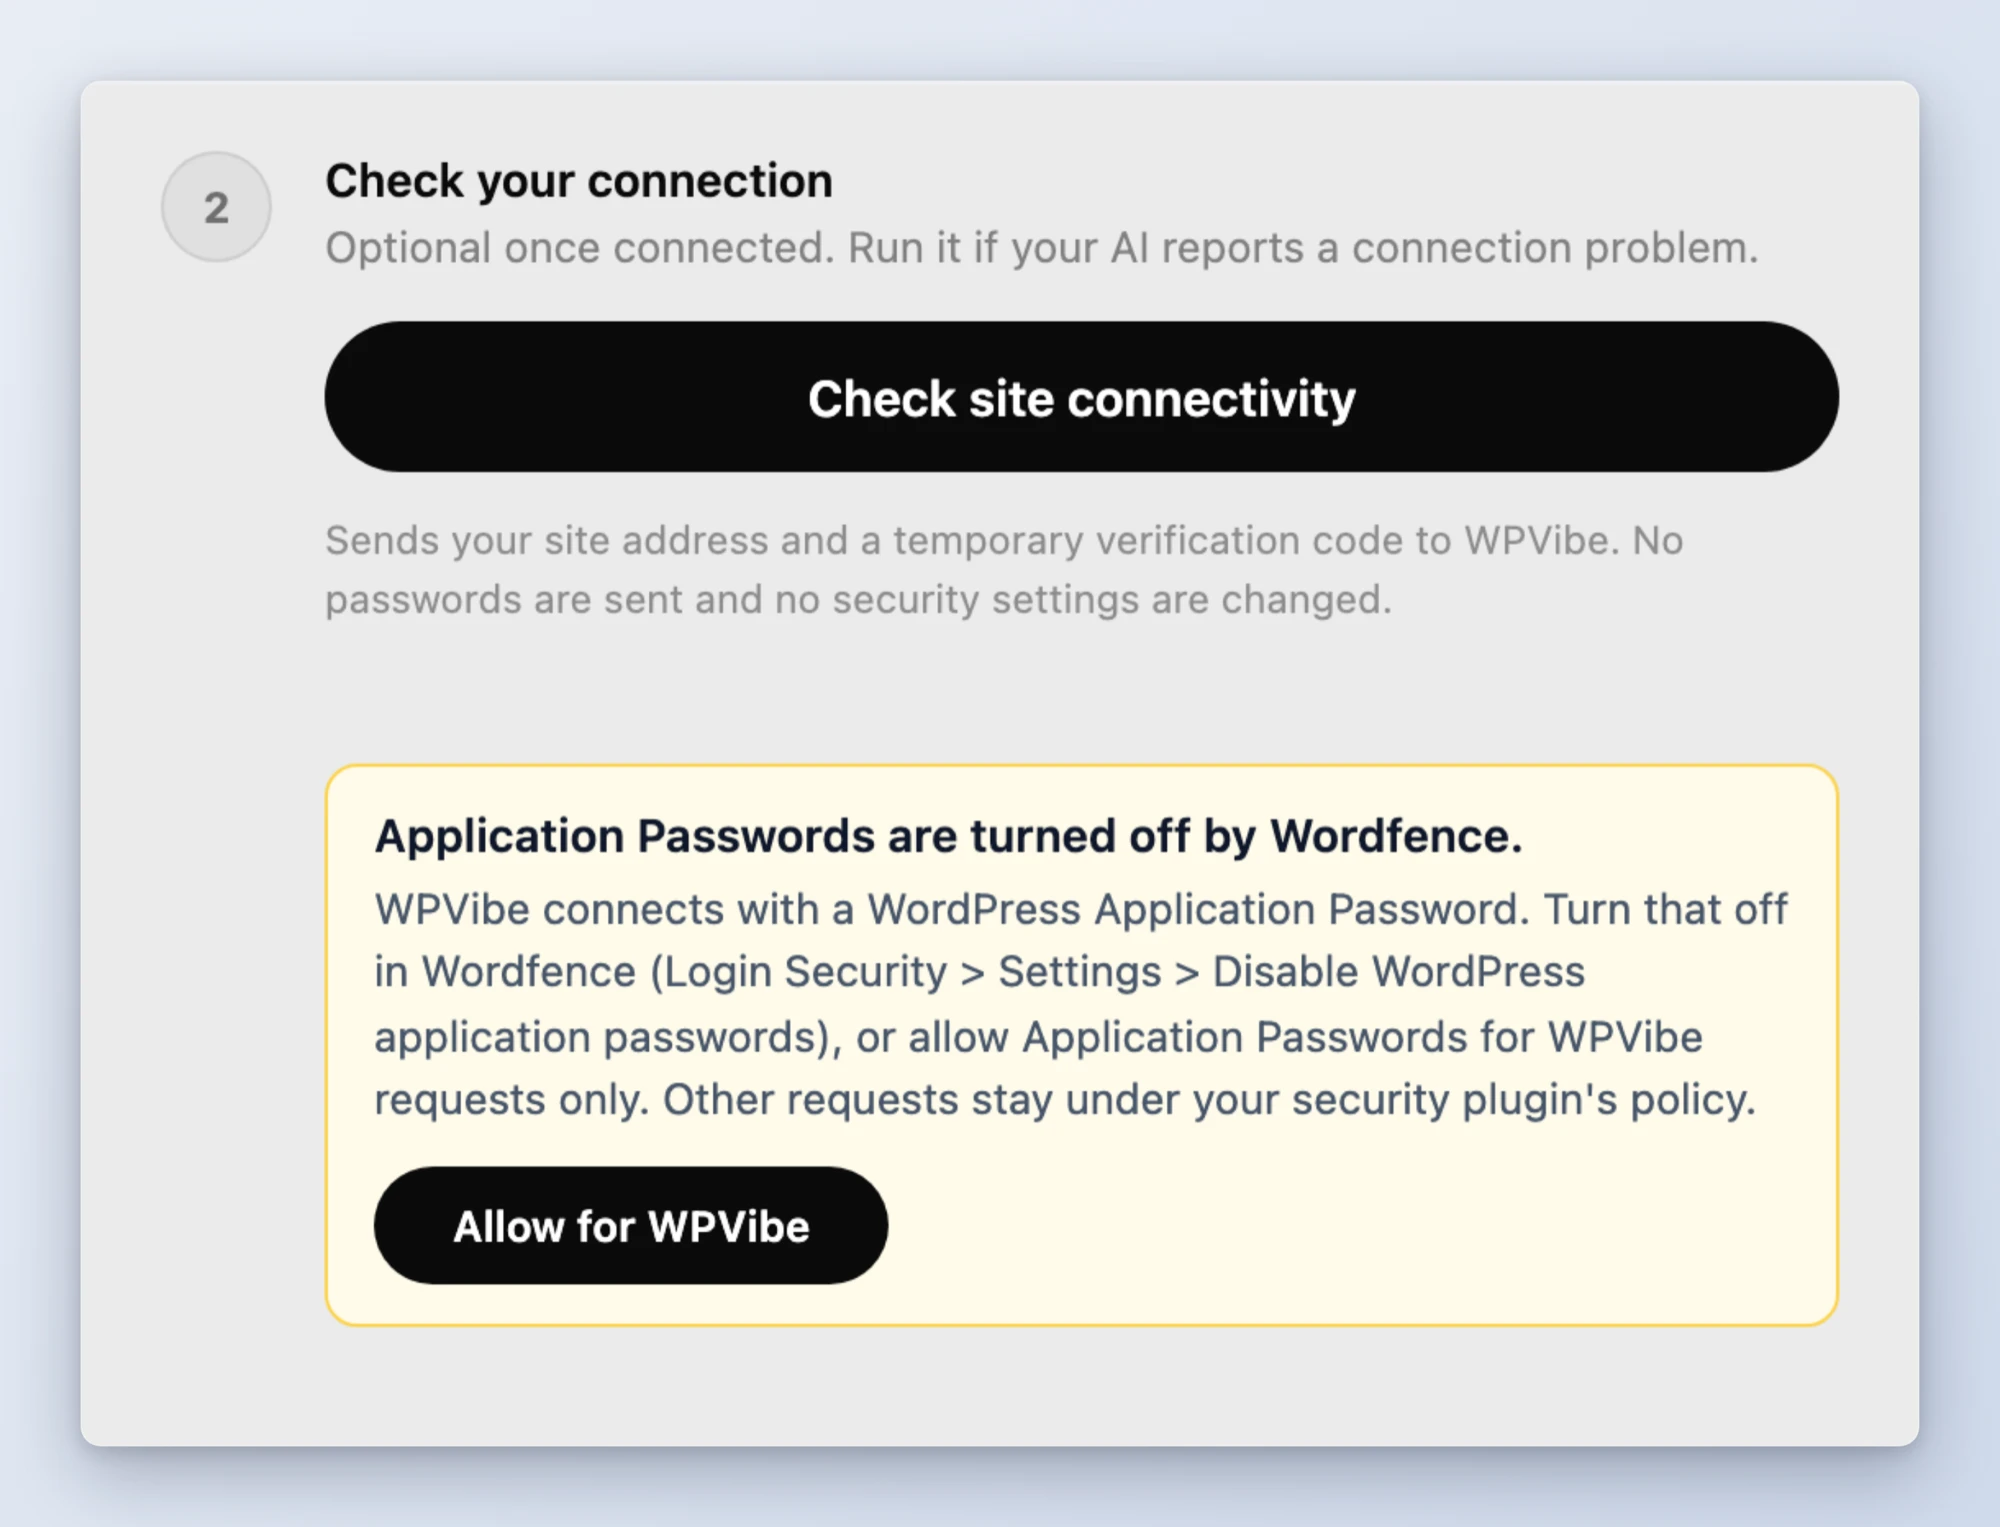
So the card now offers Allow for WPVibe. One click permits Application Passwords for WPVibe’s requests only. Every other request stays under your security plugin’s policy. The check re-runs on its own and you move on to Step 3.
Your AI gets the same answers
This is not only on the plugin page. When a tool call fails in your AI, the error now says what the plugin page would say: which layer blocked the request, the Ray ID when Cloudflare is involved, and the same rule expression. If only writes are being blocked, it says that too, so a passing read check is not mistaken for a healthy site.
Your WPVibe account page has a matching Check connections and troubleshoot view, laid out the same way: what happened, what to do, the rule to add, and a report you can copy or download.
Safer reconnects, and one rule change
Reconnecting a site now keeps your existing working password until the replacement is verified, so a failed reconnect cannot break a connection that was working. An approval that could not be confirmed in time is saved and confirmed by the first read your AI makes, and the page tells you that is what is happening.
One rule change worth knowing about: WPVibe now sends credentials only to https:// addresses. If a site was connected on plain http://, the page will ask you to connect the https:// address instead. That is the whole change, and it is on purpose.
Get it
Update the WPVibe plugin from your WordPress dashboard, or install it from WordPress.org. Then open the WPVibe page in wp-admin and click Check site connectivity. New here? Start at wpvibe.ai.